|
|
|
|
|
|
|
|
|
|
|
|
|
|
|
|
|
|
|
|
|
|
Demo
on Web
The
watercolor painting demonstration on this page shows Lian Zhen's landscapte
painting techniques.
It was done for his fouth book "Chinese Landscape Techniques for Watercolor"
which will publish by North Light Books in Fall 2013. You can see more watercolor
and Chinese painting demos with similar and different methods on variety subjects
from his books: Chinese Painting Techniques for Exquisite Watercolors, Chinese
Watercolor Painting Techniques - Painting Animals
and Chinese
Watercolor Techniques for Exquisite Flowers, as
well as on his painting demo DVDs.
To purchase Lian Zhen books
and painting demo DVDs, click Book
& Painting Demo DVDs
To
buy Giclee prints of Lian Zhen paintings, click Archival
Limited Giclee Prints
You can also learn
the techniques from Lian Zhen's workshops, click Workshops |
|
|
|
|
|
|
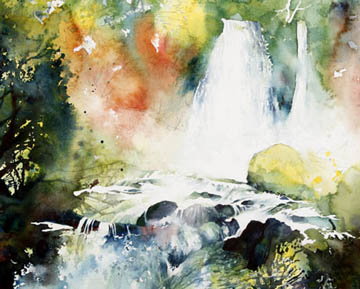
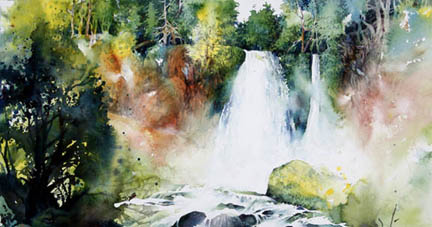
 Picture of Sahalee Fall
(McKenzie River, WA)
Picture of Sahalee Fall
(McKenzie River, WA)

Finished watercolor painting of Sahalee Fall 16"x20" |
|
|
|
|
|
|
|
|
| Materials:
Three colors – Antwerp Blue (Windsor and Newton), Naphthol Red and Hansa
Yellow Deep (M. Graham &Co.) Dilute each color with 3 teaspoons
of water into approximately medium value in 3 small dishes. Paper -
Arches140 LB cold press paper 16”x20”. Brushes – Synthetic, round number
2, 4 and 6, flat – 1/2 (with wedge shape) and ¾ inch. Masking
fluid – Pebeo.
Also see watercolor painting materials listed at the bottom of the Workshops
page on this web site.
|
| |
|
|
|
|
|
|
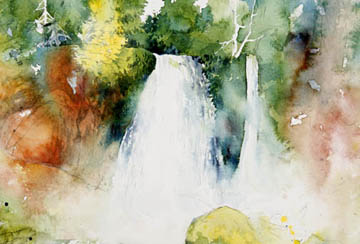
 Step 1:
roughly sketch the composition
with a #2 pencil. Take away some plants on lower right and ignore most of
rock and tree details on cliffs. Use wedge end of the 1/2” brush to apply
masking blocking waterfall at cliff, water beneath, sky, few trees on cliff
and some leaves on lower right.
Step 1:
roughly sketch the composition
with a #2 pencil. Take away some plants on lower right and ignore most of
rock and tree details on cliffs. Use wedge end of the 1/2” brush to apply
masking blocking waterfall at cliff, water beneath, sky, few trees on cliff
and some leaves on lower right. |
|
|
|
|
|
|
|
|
|
|
|
|
|
|
|
|
|
|
|
|
|
|
|
|
Step 2:
Wait for masking fluid completely dry to start painting from left cliff. Use
a sprayer to spray water 4-5 times lightly wetting that area. |
|
|
|
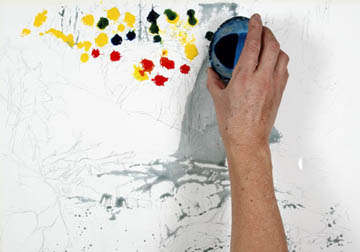
Step 3:
Pour three color liquids on it regardless ordering. More Yellow and Blue liquids
are on trees but more Red and Yellow on rocks. Try to pour them next to, but
not on top of each other. |
|
|
|
|
|
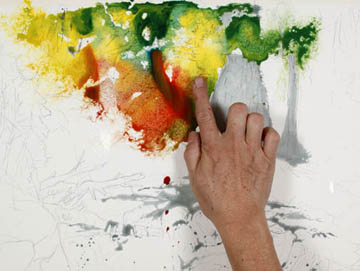
Step 4:
Spray a few more times on those color liquids to enhance their blending. Use
fingers or the ¾” to lightly mix and guide them. If there are excess
color liquids and they are not muddy, use the brush to take and drop them on
rocks and trees nearby. |
|
|
|
|
|
|
|
|
|
|
|
|
|
|
|
|
|
|
|
|
Step 6:
Spray water 4-5 times at lower fall at left. Use the ¾” to drop small
amount of Blue liquids on it. Immediately spray water a couple times on it to
create soft and smooth blending that effetely depicts flowing water. Next, lightly
wet lower right area and then pour three color liquids there. |
|
|
|

Step 5:
Spray a few more times on those color liquids to enhance their blending.
Use fingers or the ¾” to lightly mix and guide them. If there are
excess color liquids and they are not muddy, use the brush to take and
drop them on rocks and trees nearby. |
|
|
|
|
|
|
|
|
|
|
|
|
|
|
|
|
|
|
|
|
|
|
|
|
|
|
Step 8:
Next, use the same brush to mix fresh thick Blue and Red. Define rock edges
at foreground. Also, drop whole bunch of the mixture color on left and lower
right, immediately use mouth to blow it for obtaining trees at left and shrubs
on lower right. You can use straws to do blowing. |
|
|
|
|
|
|
Step 7:
Slightly wet lower left corner with the water sprayer and pour three color liquids.
Use the ¾” to mix intense Red and little Blue. Apply it on rocks there
and lower right. |
|
|
|
|
|
|
|
|
|
|
|
Step 9:
To add more trunks and branches on trees at left, take the #6 to paint them
with same color mixture as previous step. On the water fall at lower middle,
use the #4 to paint short and thin strokes to suggest water movement in light
to medium Blue. Wait for whole painting dry, lift up masking on upper fall and
water beneath. |
|
|
|
|
|
Step 10:
To create more misty effects on cliff at upper right, use wet paper towels
to lift up colors there and soften the “Balloon” edges. “Balloon” is a special
effect in watercolor caused by excess water on a colored area where water
pushes pigments out and form edges.
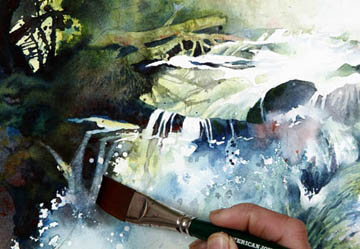
Step 11: To define upper fall, use the #4 lightly wet its
left and right edges randomly leave dry spots, and then use the #6 to apply
light to medium Blue on those wetted areas. Next, we paint the log and rocks
bellow it. Use the #4 brush to mix fresh thick Blue and little Red to paint
their shaded sides. Immediately, use the #6 with little water to blend the
dark Blue smoothly onto their bright portions. |
|
|
|
|
|
|
|
Step 12:
Now we paint plants
around upper fall. Use the #2 to apply light Blue around the yellowish tree.
Then use the #6 with little water to blend it away from the tree edge onto background
foliages (paint around technique). Define other trees the same way. The further
they are the darker Blue used. |
|
|
|
|
|
|
|
|
|
|
|
|
|
|
|
|
|
|
|
|
|
|
|
|
|
|

Step 13:
Use the #2 to call out tree trunks and branches on upper right by painting
around them with mixture of medium to intense Blue and Red. To define rocks
on cliff, paint their shadows with mixture of medium Red and little Blue.
Give more definitions on rocks close to waterfall.
|
|
|
|
|
Step 14:
Use the same brush to mix intense Blue and Red, paint gaps between rocks and
tree roots. Also, use the same mixture color to define one more layer of trees,
by painting around their trunks and foliages. To touch up the white trees that
were masked before, use the #2 to fill their trunks and branches with Yellow
and Red. |
|
|
|
|
|
|
Step 15:
In as same way, define trees and rocks on cliff at left. Remember not to paint
them with same level of details, or your painting appears rigid (“change of
details”). |
|
|
|
|
|
Step 16:
Use the #2 to call out two logs on middle left by paint around them with mixture
of intense Blue and Red. Immediately, use #6 to blend it away from log edges
onto background smoothly. Now we want more water flowing on top of rocks at
lower left. Use the ¾” and little water to lift up colors on top of rocks
there. |
|
|
|
|
|
|
|
|
|
|
|
|
|
|
|
|
|
|
|
Step
17: Lift up all masking on lower portion of the painting. At lower
right, fill leaves with Yellow and Blue while branches with Red and Yellow.
Finally, for white dots saved by splashing masking on lower fall, fill some
of them with light Blue and leave few white. |
|
|
|
|
|
|
|
|
|
|
|
|
|
|
|
|
|
|
|
|
|
Send mail to lianzhen@yahoo.com
with questions or comments about this web site.
Copyright © by Lian Quan Zhen. Tel: 510. 685.2654
|
|
|
 |
|
|
|
|
|
|
|
|
|
|
|
|
|
|
|
|
|
|
|
|
|
|